


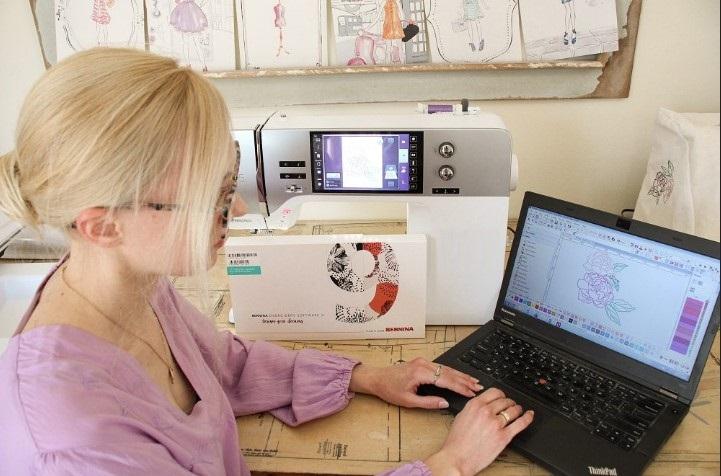
A JPG image is made of tiny pixels. An embroidery machine does not read these pixels. It reads stitch data. This is why a JPG file must be changed into a proper embroidery file before it can be sewn. The goal is not just to change the file name. The artwork must be planned for thread and fabric.
With professional Convert JPG Images into PES Files work, your image is rebuilt as a stitch file that a compatible machine can read. The process includes stitch type, stitch order, density, underlay, and stitch direction. Good file prep helps the design sew with clean lines and clear shapes. It also helps reduce gaps, thread breaks, and puckering.
Why JPG Files Need More Work
A JPG is a picture file. It stores color and shape as pixels. A PES file is very different. It stores stitch data that tells an embroidery machine where to sew, when to stop, and when to change thread.
A machine needs more than the shape of a logo. It needs a clear stitch plan. Each part of the artwork must be mapped to a stitch type.
For example, a large area may need a fill stitch. A narrow line may work better with a satin stitch. Small details may need to be removed or made larger so they can sew well.
This is why a simple file converter is not enough.
What Makes a Good PES File?
A good PES file should match the artwork while also fitting the fabric and machine.
Clear Stitch Paths
Stitch paths should flow in a clean order. The machine should not jump from one area to another without a good reason.
A clean path can help:
-
Reduce long jumps
-
Lower thread use
-
Cut down thread trims
-
Improve stitch flow
-
Keep the design neat
Correct Stitch Density
Density means how close the stitches are to each other. Too much density can make fabric stiff. It may also cause puckering.
Too little density can leave gaps. The fabric may show through the design.
The right setting depends on the stitch type, fabric, thread, and design size.
Proper Underlay
Underlay is the first layer of stitches under the main design. It gives the top stitches a firm base.
Good underlay can help:
-
Hold the fabric in place
-
Support top stitches
-
Improve shape
-
Reduce gaps
-
Limit distortion
The best underlay is not the same for every fabric.
The JPG to PES Process
Turning a JPG into a good PES file takes several steps. Each step has a clear job.
1. Check the Artwork
The first step is to review the JPG.
A digitizer looks at:
-
Image size
-
Image quality
-
Main shapes
-
Text
-
Colors
-
Fine details
-
Background
-
Design use
A clear logo is easier to work with. A small or blurry JPG may need cleanup before digitizing starts.
2. Clean the Design
The artwork may have rough edges or extra marks. These can make the stitch plan harder to build.
The designer may clean the image and remove parts that are not needed.
This step is important for logos. A clean source image gives the digitizer a better base.
3. Set the Final Size
The same design may be used on a hat, shirt, jacket, or patch. Each use may need a different size.
A small design cannot hold the same level of detail as a large design.
Tiny text is a common problem. If letters are too small, they may not sew clearly. A skilled digitizer may change the letter size or simplify the shape.
4. Pick the Right Stitch Types
Different parts of a design need different stitches.
Satin Stitches
Satin stitches work well for narrow areas, borders, and some lettering. They can create a smooth and bold look.
Fill Stitches
Fill stitches cover larger areas. The stitch direction can change across the design to add shape and improve the look.
Running Stitches
Running stitches work well for thin lines and fine details. They use less thread than large fill areas.
5. Set Stitch Direction
Stitch direction has a big effect on the final look.
Changing the angle can help show shape and depth. It can also make a design look more natural.
For example, a curved part of a logo may need a stitch flow that follows its shape. A poor angle can make the design look flat or uneven.
6. Add Underlay and Pull Compensation
Fabric can move as it is stitched. Some parts may pull inward. This is called pull.
Pull compensation adds extra width where needed. It helps the finished design keep its planned shape.
The right amount depends on the fabric and stitch type. Too much can make edges look heavy.
7. Set the Color Order
Thread colors should follow a smart order. A good order can reduce trims and jumps.
The digitizer also checks color changes. This helps the machine stop at the right time for a new thread.
Why Fabric Matters
A PES file should not be made without thinking about the fabric.
A design may stitch well on cotton but need changes for a cap or stretch fabric.
Cotton
Cotton is often easier to stitch. Still, density and underlay must be balanced.
Stretch Fabric
Stretch fabric can move during sewing. More support may be needed.
Caps
Caps have a curved shape. They also have a center seam. Stitch direction and design width must be planned with care.
Jackets
Jackets may use thick or layered fabric. A strong stitch plan can help the design stay clean.
Common Problems With Poor Conversion
A quick or poor conversion can lead to many issues.
Thread Breaks
Too much density or poor stitch paths can place extra stress on thread.
Puckering
Puckering can happen when fabric is pulled or when a design has too many stitches.
Gaps
Gaps may appear when stitch areas do not overlap enough.
Poor Small Detail
Very small shapes may disappear when stitched. This is common when a JPG has tiny lines or text.
Uneven Edges
Poor stitch direction or wrong stitch settings can create rough edges.
Why Manual Digitizing Helps
Automatic tools can trace an image. But embroidery is more than tracing.
A person can judge which details will stitch well. They can also adjust the design based on fabric, size, and machine needs.
Manual work can help with:
-
Stitch order
-
Density
-
Underlay
-
Stitch direction
-
Small details
-
Pull compensation
-
Color changes
This extra care can make a large difference in the final stitch-out.
How to Check a PES File Before Production
Never assume a file is ready just because it opens on a computer.
Review the Design
Look for missing shapes, odd lines, or unwanted parts.
Check the Stitch Count
A very high stitch count may mean the design needs better planning. But the lowest count is not always best. Quality comes first.
Run a Test Stitch
A test stitch is one of the best ways to check a file.
Use the same or similar fabric that will be used for the final job. Check the design from the first stitch to the last.
Look for:
-
Gaps
-
Loose stitches
-
Thread breaks
-
Puckering
-
Poor detail
-
Uneven edges
-
Wrong colors
Make Changes After Testing
If a test shows a problem, update the file. Do not keep using a file that gives poor results.
How to Choose a PES Digitizing Service
If you do not have time or skill to digitize the design yourself, choose a service with real embroidery experience.
Look for a provider that:
-
Reviews the artwork before work starts.
-
Uses manual or expert digitizing.
-
Understands different fabrics.
-
Offers test files or stitch previews when possible.
-
Supports the PES format you need.
-
Can handle logos, text, and custom artwork.
-
Gives clear pricing.
-
Provides a clear delivery time.
-
Makes changes when needed.
-
Protects your artwork and files.
Do not choose a service based only on price. A cheap file that stitches badly can cost more in wasted thread, fabric, and machine time.
The Role of Experience
Embroidery digitizing improves with hands-on work. A skilled digitizer knows that a design that looks perfect on a screen may not sew the same way.
Experience helps the designer predict common issues. It also helps them make better choices for each project.
For example, a logo for a flat shirt may need a different stitch plan than the same logo for a curved cap.
This is where a trusted name such as Absolute Digitizer can add value. The focus should always be on the stitch result, not just the file format.
Final Tips for Better Results
Keep these tips in mind before sending a JPG for PES digitizing:
Use the Best JPG You Have
A clear image gives the digitizer more useful information.
Tell the Digitizer the Final Size
Size affects detail, density, and stitch choice.
Share the Fabric Type
The same file may not work equally well on every fabric.
Mention the Machine
Tell the service which machine or machine type you plan to use.
Ask for a Test
A test stitch can show issues before a large order is made.
Keep the Original Artwork
Save the JPG and any other source files. They may be needed for future edits or size changes.
Final Thoughts
A JPG image is only the starting point. A good PES file needs careful planning. The artwork must be rebuilt as stitch data that works with the fabric and machine.
Good digitizing focuses on more than appearance on a screen. It considers stitch type, density, underlay, stitch direction, pull compensation, color order, and final size.
When these details are handled well, the result is cleaner and more reliable embroidery. Whether you are making a business logo, custom patch, hat design, uniform, or personal project, a properly prepared PES file can save time and reduce waste.
The best approach is simple: use clear artwork, share the right project details, test the file, and work with a skilled digitizer when the design needs expert care.







 English